PC-BSD has made installing FreeBSD an almost trivial task -- give the PC-BSD installer a whole disk, and off it goes. However, if you're like me, you have a smaller SSD device (~100 GB), a bunch of really large and cheap traditional hard drives (2TB+), and fairly limited time. One of the great things about SSD is that we can use part of it as a
cache device (L2ARC) or for
data robustness (ZIL) to help out the big slow rotational hard drives.
First, a few terminology things. You're probably familiar with the idea of
partitions from Linux and Windows world; traditionally, a disk can have four
primary partitions, including one
extended partition that can be further divided into additional
logical partitions. In BSD (and Solaris),
primary partitions are synonymous with slices, and are most comparable to extended partitions.
Each slice (labeled
s1 through
s4 -- there is no zero slice) can contain multiple filesystems (labeled
a through
t). So, in BSD, the third filesystem in the second slice on a device called "
ada0" would traditionally be represented by the device file
/dev/ada0s2c (more on what I mean by
traditional later).
The trick here is knowing that
PC-BSD's automated installer can install to a specific slice. This means that you can create other slices on the disk to reserve space for things like L2ARC, or installation of other operating systems.
Let's boot our system using the PC-BSD 10.0 installer media, and I'll give a quick run-through of how one can create separate slice for L2ARC or whatnot.
The key points that follow:
- Reserve enough room at the beginning of the partition table for GRUB
- Align to 4k sector size for modern media
- disk_ident is currently broken and hides filesystems
Once you've booted the installer, here are the steps to follow:
After loading the PC-BSD install media, launch an
xterm by right-clicking on the desktop area outside of the main installer window, or clicking on the icon corresponding to "Emergency Shell and Utilities."
Once you've got the command line, execute
camcontrol devlist to figure out what drive corresponds to what entry in
/dev. The following steps wipe out existing partition tables, so you are going to want to be sure you're doing this on the correct device.
First things first: disk_ident is broken and causes drive labels corresponding to FreeBSD partitions to disappear. In order fix this problem, we have to disable this feature through
sysctl:
pcbsd# sysctl kern.geom.label.disk_ident.enable=0
Wipe out the existing partition table on the disk in question (here, we assume
/dev/da0 corresponds to the drive that you're going to install on, as determined from the aforementioned camcontrol devlist command).
Hat tip to Warren Block for his wonderful instructions concerning partitioning; some steps are replicated below.
pcbsd# dd if=/dev/zero of=/dev/da0 bs=512 count=34
In order to destroy an existing backup GPT table, we obtain the media size in sectors:
pcbsd# diskinfo -v da0
        512             # sectorsize
        11912167424     # mediasize in bytes (11G)
        23265952        # mediasize in sectors
etc...
Subtract 34 sectors from your mediasize in sectors by using python as a fancy calculator:
pcbsd# python -c "print (23265952 - 34)"
23265918
Delete the possible backup
GPT:
pcbsd# dd if=/dev/zero of=/dev/da0 bs=512 seek=23265918
Create a new
MBR partition table.
pcbsd# gpart create -s mbr da0
Now, choose a size, in gigabytes, that is sufficiently large to hold your L2ARC or whatever else. Pass this value in after the
-s flag as you create a corresponding slice with 4k alignment and sufficient space for GRUB's bootcode (2 megabytes? I took a guess with 2MB, I haven't researched the "right" size).
pcbsd# gpart add -t freebsd -a 4k -b 2M -s 30G da0
da0s1 added
Create a bsdlabel partitioning scheme for the slice and add your cache device.
Note that adding alone is not enough. This is what trips me up every time:
pcbsd# gpart create -s bsd da0s1
da0s1 created
pcbsd# gpart add -t freebsd-zfs -a 4k da0s1da0s1a added
You can give it a handy label so that you know why you created the partition in the first place:
pcbsd# glabel label l2arc da0s1a
This step allows you to view your disk providers under /dev/label/XXXX -- mighty handy if you happen to swap SATA ports, etc.
Now, create the slice that you want FreeBSD to live inside of. If you omit the -s argument, the rest of the disk's space will be used.
pcbsd# gpart add -t freebsd -a 4k da0
da0s2 added
Hooray! Continue running the installer.
You must choose "Desktop" configuration. Server configuration will not give you sufficient granularity to control where PC-BSD is installed.
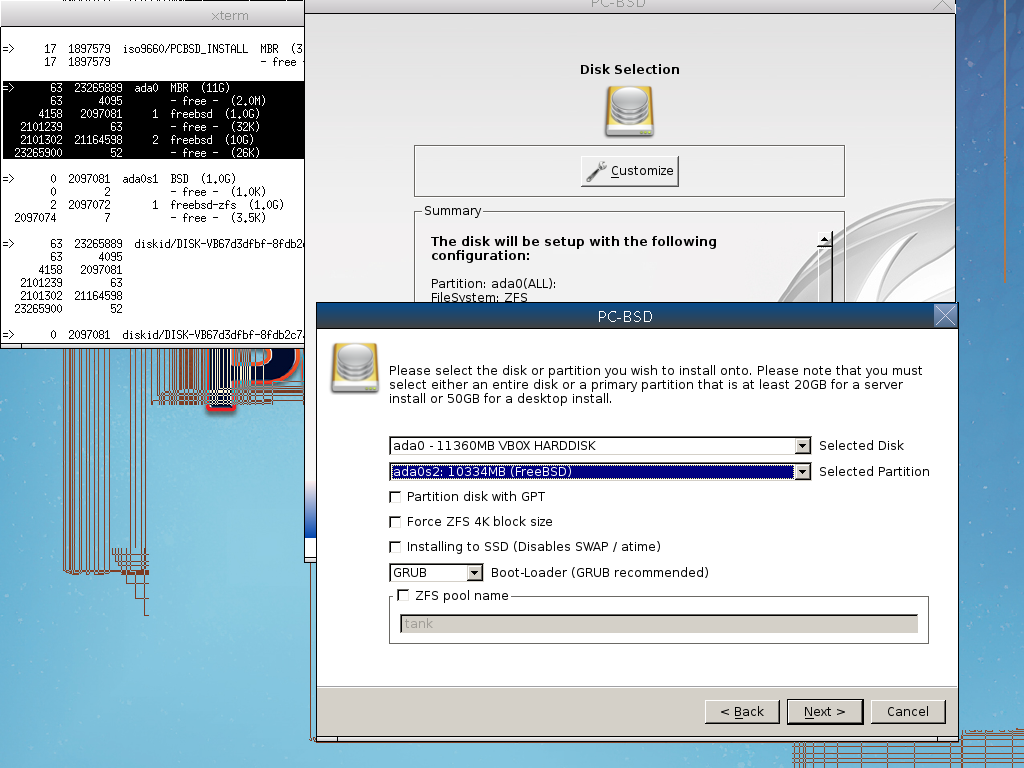
Once you reach the Disk Selection screen, click the "Customize" button. Choose the "Advanced" option that corresponds to the little bicycle icon. Under the "Selected Partition" dropdown, choose da0s2, or whatever corresponds to your second slice (
even the user-friendly installer is referring to slices as partitions! No wonder we are all so confused...) If you're using modern SSD hardware, you probably want to force ZFS 4k block size. Things should look like this:
Note the output of
gpart show in the terimal in the upper-left corner of the screen. The screenshot has lines everywhere due to redraw problems in the installer.
Now, you have plenty of space on your SSD for your root filesystem and L2ARC -- great for a home server! Only one last detail remains.
When your machine reboots, you probably want to disable
disk_ident so that you can access the partitions in your first slice. This forces a "traditional" naming scheme in which disk partitions show up as e.g.
/dev/da0s2b instead of
/dev/diskid/CLASS_NAME-ident, which actually would be more portable if it didn't break compatibility with the trailing "a-t" lettered partition naming scheme. Perform the following commands.
# echo "kern.geom.label.disk_ident.enable=0" >> /boot/loader.conf
# grub-mkconfig -o /boot/grub/grub.cfg
All done!