Thursday, December 18, 2014
is Wingdings for →
Today, when importing a Windows document from one of my colleagues, I kept finding Unicode character F0E0 boxes everywhere. These should simply be replaced with the rightwards arrow character (→).
Thursday, September 25, 2014


Monday, August 11, 2014
How to download Echo360 videos
TL;DR for techies: Change your web browser’s user agent to an Android phone; e.g.: Mozilla/5.0 (Android 4.2; rv:19.0) Gecko/20121129 Firefox/19.0
Steps to install User Agent Switcher
This first section only needs to be done once. there are other ways of modifying the User-Agent: string in Firefox, but I find this to be most convenient. Similar extensions are available for Chrome.
- Install Firefox (if you don’t have it already)
- Press the Alt key to temporarily display Firefox’ old-style menus (or go to this tutorial to enable them permanently, which is my preferred style).
- Use the tools menu. Tools ➔ Default User Agent ➔ Edit User Agents
- Click the Import… button, and choose the User Agent List XML file that you downloaded in the previous step.
Once that’s all installed, go to Sakai. Before you navigate to the Echo360 website to download lectures, you must change your user agent.
Navigate Echo360 and pretend to be an Android device
- Hit the Alt key
- Using the revealed menu, select Tools ➔ Default User Agent ➔ Mobile Devices ➔ OS ➔ Android ➔ Android 4.2 Firefox 19.0.
- Click on the Echo360 website.
- Select a video to download. Right-click on it and choose to download the video.
- Remember to change your user agent back through Tools ➔ Android 4.2 Firefox 19.0 ➔ Default User Agent.
The end result of this process is that the video will be displayed with a HTML5 tag, and will be downloadable as an mp4 file.
UPDATE:
austynguo has another method that works by using an Apple user agent:
austynguo has another method that works by using an Apple user agent:
For all the University of Sydney people out there I've written a quick guide on how to download recordings by using a web browser (Chrome) to find the necessary links and VLC player to capture and export the stream. Not sure if this method works with other university streaming systems though.
It's a little involved but works well at the moment.
Find the guide here: https://github.com/austynguo/echo360-downloader
Sunday, July 13, 2014
Enigmail: Key not found or not valid? Install pinentry
I recently upgraded PC-BSD from scratch, and was dismayed to find that Enigmail no longer worked correctly and provided me with a rather misleading dialog box:
Send operation aborted.
Key 0xABCDEF01 not found or not valid. The (sub-)key might have expired.
After bashing my head against the wall for a little while, I finally had the bright idea of trying to encrypt a message from the command line:baitisj@foo:/tmp$ gpg -e -r adele@gnupp.de -a -s
...gpg-agent[10380]: can't connect to the PIN entry module: IPC connect call failed
gpg-agent[10380]: command get_passphrase failed: No pinentry
baitisj@foo:/tmp$ sudo pkg install pinentry-gtk2
Victory!
Sunday, July 6, 2014
Semi-automatic installation of PC-BSD 10.0 with a custom MBR partition table
PC-BSD has made installing FreeBSD an almost trivial task -- give the PC-BSD installer a whole disk, and off it goes. However, if you're like me, you have a smaller SSD device (~100 GB), a bunch of really large and cheap traditional hard drives (2TB+), and fairly limited time. One of the great things about SSD is that we can use part of it as a cache device (L2ARC) or for data robustness (ZIL) to help out the big slow rotational hard drives.
First, a few terminology things. You're probably familiar with the idea of partitions from Linux and Windows world; traditionally, a disk can have four primary partitions, including one extended partition that can be further divided into additional logical partitions. In BSD (and Solaris), primary partitions are synonymous with slices, and are most comparable to extended partitions. Each slice (labeled s1 through s4 -- there is no zero slice) can contain multiple filesystems (labeled a through t). So, in BSD, the third filesystem in the second slice on a device called "ada0" would traditionally be represented by the device file /dev/ada0s2c (more on what I mean by traditional later).
The trick here is knowing that PC-BSD's automated installer can install to a specific slice. This means that you can create other slices on the disk to reserve space for things like L2ARC, or installation of other operating systems.
Let's boot our system using the PC-BSD 10.0 installer media, and I'll give a quick run-through of how one can create separate slice for L2ARC or whatnot.
The key points that follow:
After loading the PC-BSD install media, launch an xterm by right-clicking on the desktop area outside of the main installer window, or clicking on the icon corresponding to "Emergency Shell and Utilities."
Once you've got the command line, execute camcontrol devlist to figure out what drive corresponds to what entry in /dev. The following steps wipe out existing partition tables, so you are going to want to be sure you're doing this on the correct device.
First things first: disk_ident is broken and causes drive labels corresponding to FreeBSD partitions to disappear. In order fix this problem, we have to disable this feature through sysctl:
Now, create the slice that you want FreeBSD to live inside of. If you omit the -s argument, the rest of the disk's space will be used.
Once you reach the Disk Selection screen, click the "Customize" button. Choose the "Advanced" option that corresponds to the little bicycle icon. Under the "Selected Partition" dropdown, choose da0s2, or whatever corresponds to your second slice (even the user-friendly installer is referring to slices as partitions! No wonder we are all so confused...) If you're using modern SSD hardware, you probably want to force ZFS 4k block size. Things should look like this:
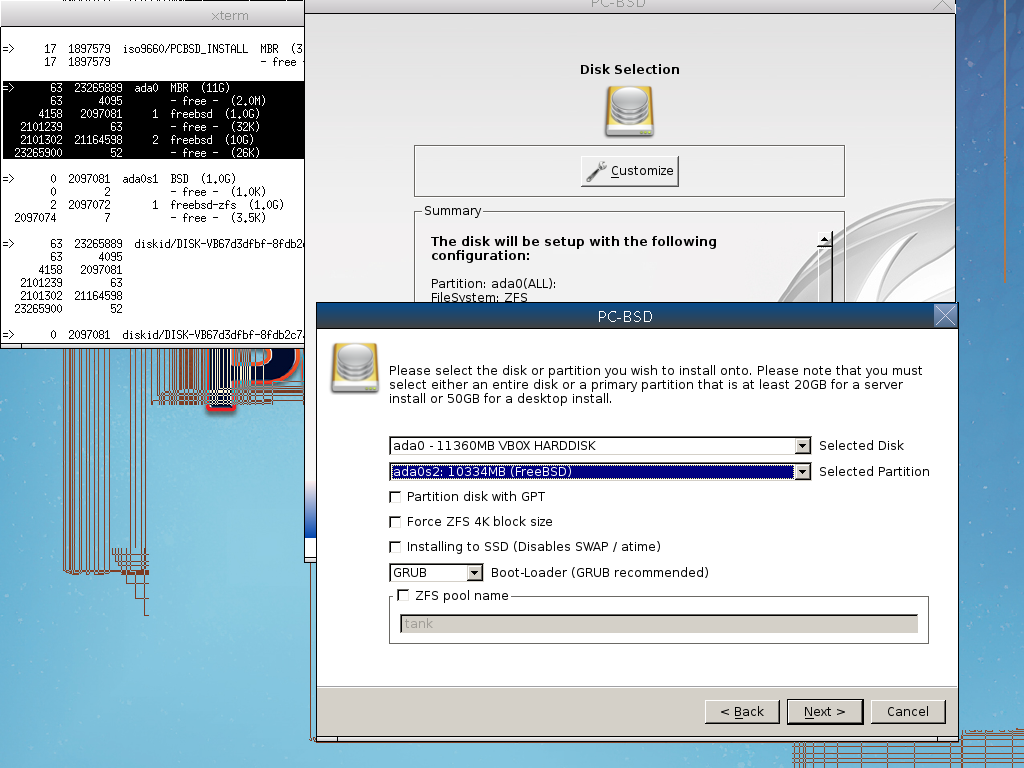
Note the output of gpart show in the terimal in the upper-left corner of the screen. The screenshot has lines everywhere due to redraw problems in the installer.
Now, you have plenty of space on your SSD for your root filesystem and L2ARC -- great for a home server! Only one last detail remains.
When your machine reboots, you probably want to disable disk_ident so that you can access the partitions in your first slice. This forces a "traditional" naming scheme in which disk partitions show up as e.g. /dev/da0s2b instead of /dev/diskid/CLASS_NAME-ident, which actually would be more portable if it didn't break compatibility with the trailing "a-t" lettered partition naming scheme. Perform the following commands.
First, a few terminology things. You're probably familiar with the idea of partitions from Linux and Windows world; traditionally, a disk can have four primary partitions, including one extended partition that can be further divided into additional logical partitions. In BSD (and Solaris), primary partitions are synonymous with slices, and are most comparable to extended partitions. Each slice (labeled s1 through s4 -- there is no zero slice) can contain multiple filesystems (labeled a through t). So, in BSD, the third filesystem in the second slice on a device called "ada0" would traditionally be represented by the device file /dev/ada0s2c (more on what I mean by traditional later).
The trick here is knowing that PC-BSD's automated installer can install to a specific slice. This means that you can create other slices on the disk to reserve space for things like L2ARC, or installation of other operating systems.
Let's boot our system using the PC-BSD 10.0 installer media, and I'll give a quick run-through of how one can create separate slice for L2ARC or whatnot.
The key points that follow:
- Reserve enough room at the beginning of the partition table for GRUB
- Align to 4k sector size for modern media
- disk_ident is currently broken and hides filesystems
After loading the PC-BSD install media, launch an xterm by right-clicking on the desktop area outside of the main installer window, or clicking on the icon corresponding to "Emergency Shell and Utilities."
Once you've got the command line, execute camcontrol devlist to figure out what drive corresponds to what entry in /dev. The following steps wipe out existing partition tables, so you are going to want to be sure you're doing this on the correct device.
First things first: disk_ident is broken and causes drive labels corresponding to FreeBSD partitions to disappear. In order fix this problem, we have to disable this feature through sysctl:
Wipe out the existing partition table on the disk in question (here, we assume /dev/da0 corresponds to the drive that you're going to install on, as determined from the aforementioned camcontrol devlist command). Hat tip topcbsd# sysctl kern.geom.label.disk_ident.enable=0
In order to destroy an existing backup GPT table, we obtain the media size in sectors:pcbsd# dd if=/dev/zero of=/dev/da0 bs=512 count=34
Subtract 34 sectors from your mediasize in sectors by using python as a fancy calculator:
pcbsd# diskinfo -v da0
        512             # sectorsize
        11912167424     # mediasize in bytes (11G)
        23265952        # mediasize in sectors
etc...
Delete the possible backup GPT:pcbsd# python-c "print (23265952 - 34)"23265918
Create a new MBR partition table.pcbsd# dd if=/dev/zero of=/dev/da0 bs=512 seek=23265918
Now, choose a size, in gigabytes, that is sufficiently large to hold your L2ARC or whatever else. Pass this value in after the -s flag as you create a corresponding slice with 4k alignment and sufficient space for GRUB's bootcode (2 megabytes? I took a guess with 2MB, I haven't researched the "right" size).pcbsd# gpart create -s mbr da0
Create a bsdlabel partitioning scheme for the slice and add your cache device. Note that adding alone is not enough. This is what trips me up every time:pcbsd#gpart add -t freebsd -a 4k -b 2M -s 30G da0da0s1 added
You can give it a handy label so that you know why you created the partition in the first place:pcbsd# gpart create -s bsd da0s1da0s1 createdpcbsd# gpart add -t freebsd-zfs -a 4k da0s1da0s1a added
This step allows you to view your disk providers under /dev/label/XXXX -- mighty handy if you happen to swap SATA ports, etc.pcbsd# glabel label l2arc da0s1a
Now, create the slice that you want FreeBSD to live inside of. If you omit the -s argument, the rest of the disk's space will be used.
Hooray! Continue running the installer. You must choose "Desktop" configuration. Server configuration will not give you sufficient granularity to control where PC-BSD is installed.pcbsd#gpart add -t freebsd -a 4k da0da0s2 added
Once you reach the Disk Selection screen, click the "Customize" button. Choose the "Advanced" option that corresponds to the little bicycle icon. Under the "Selected Partition" dropdown, choose da0s2, or whatever corresponds to your second slice (even the user-friendly installer is referring to slices as partitions! No wonder we are all so confused...) If you're using modern SSD hardware, you probably want to force ZFS 4k block size. Things should look like this:
Note the output of gpart show in the terimal in the upper-left corner of the screen. The screenshot has lines everywhere due to redraw problems in the installer.
Now, you have plenty of space on your SSD for your root filesystem and L2ARC -- great for a home server! Only one last detail remains.
When your machine reboots, you probably want to disable disk_ident so that you can access the partitions in your first slice. This forces a "traditional" naming scheme in which disk partitions show up as e.g. /dev/da0s2b instead of /dev/diskid/CLASS_NAME-ident, which actually would be more portable if it didn't break compatibility with the trailing "a-t" lettered partition naming scheme. Perform the following commands.
All done!# echo "kern.geom.label.disk_ident.enable=0" >> /boot/loader.conf# grub-mkconfig -o /boot/grub/grub.cfg
Wednesday, June 11, 2014
RSS feed of search results in eBay: where did that lil' RSS button go?
For some reason, eBay did away with their incredibly useful search feature that published an RSS feed of results matching a given search.
However, there is still a "hack" that enables this useful feature. Ebay member jjb262 contributed this wisdom:
Execute the search, copy the URL in the address bar, then add &rss=1 at the end.Bingo, problem solved, but this leaves me with concerns. As technologies like Google Reader and RSS buttons become less apparent, the Web has become less and less of a friendly, open, and connected place...
Thursday, March 13, 2014
Ankidroid issues on Nook Simple Touch
I love using the rooted Nook Simple Touch for work outside in the sunshine. Unfortunately, recent versions of Ankidroid have a particular bug that hasn't been fixed in production code yet. Here's a link to a custom compiled version of Ankidroid for NST, including a more detailed description of the problem:
http://theitcrow.wordpress.com/2013/08/18/ankidroid-crashing-on-nook-simple-touch/
http://theitcrow.wordpress.com/2013/08/18/ankidroid-crashing-on-nook-simple-touch/
Friday, February 7, 2014
Tips when upgrading PC-BSD 9.2 to PC-BSD 10
Here are some tips for you, if you decide to do a live upgrade from PC-BSD 9.2 to PC-BSD 10:
- After your machine reboots for the first time, run pkg install -f to update all packages in order to match packages to the base system libraries.
- Make sure that /etc/loader.conf contains the entries that you need for your hardware. In my case, nvidia_load="YES" is important.
- After the aforementioned modifications, run grub-mkconfig -o /boot/grub/grub.cfg due to a known bug when upgrading grub.
- In my case, pc-updatemanager didn't install the base overlay correctly. I was missing several important libraries; these omissions prevented both ssh and sshd from running. To fix:
- Back up your /etc/ directory (and everything else -- I used a zfs snapshot -r tank)
- Download the base system overlay from your favorite mirror into a nice place like /var/tmp/
- cd /; tar xfym /var/tmp/base.txz
- Check for missing / broken libraries by using libchk (I uninstalled many packages that were discontinued / no longer applicable)
Thursday, January 23, 2014
No monitor device on USB sound card? No problem.
My USB sound card doesn't have a "monitor" mixer device. In other words, in order to listen to audio that is being recorded through my speakers or headphones, I need to record and play back that audio.
PulseAudio makes this somewhat easy using module-loopback, although the method is esoteric, so here are the applicable commands.
In order to figure out what input and output devices to use,
In my case, my source device is oss_input.dsp2, and my sink device is oss_output.dsp2. Therefore, I can load the appropriate module:
There is a bit of latency using this method, but at least I don't have to involve a hardware mixer in my set-up.
PulseAudio makes this somewhat easy using module-loopback, although the method is esoteric, so here are the applicable commands.
In order to figure out what input and output devices to use,
pactl list | grep -1 StateYou should see a number of sources and sinks. The key piece of information is the Name: field, which allows us to specify which device to use in the loopback chain.
In my case, my source device is oss_input.dsp2, and my sink device is oss_output.dsp2. Therefore, I can load the appropriate module:
An ID number, corresponding to the module ID, is returned on the command line. When you want to unload the loopback module, supply this argument to This is the argument to pactl unload-module
pactl load-module module-loopback source="oss_input.dsp2" sink="oss_output.dsp2" latency_msec=1
There is a bit of latency using this method, but at least I don't have to involve a hardware mixer in my set-up.
Saturday, January 18, 2014
Specifying name servers with resolvconf
I finally figured out how I can tell resolvconf to preferentially add my favorite DNS servers before it adds name servers supplied by DHCP servers.
Create the file /etc/resolvconf.conf. If you use IPv6 and OpenDNS, the file should contain the following (all on one line):
Create the file /etc/resolvconf.conf. If you use IPv6 and OpenDNS, the file should contain the following (all on one line):
name_servers="2620:0:ccc::2 2620:0:ccd::2 208.67.222.222 208.67.220.220"
Subscribe to:
Posts (Atom)