Setting it up has been a hassle, but the MF6530 has been printing envelopes more reliably than any printer I have ever owned. I use the freely available MS Word clone,
OpenOffice 3.2, and
Microsoft Windows.
Here are some tips to get things started:
- You must load envelopes into the multi-purpose tray FACE DOWN and with the flap (the part that you lick to close the envelope) towards the REAR of the printer. The pictographs on the multipurpose tray illustrate the envelope's flap on the same side as the control panel on the front of the printer -- and this doesn't work. Rotate the envelope 180 degrees with respect to how it is shown in the pictographs, and you're good.
Printer Setup- Using the "Additional Functions" and the -, OK, and + buttons, select:
COMMON SETTINGS
1. DEFAULT SETTINGS
and press OK. Make sure that DEFAULT SETTINGS is set to COPY and not SCAN. This makes it easier to enter the paper size if you don't elect to program the printer to use the multipurpose tray's standard settings (MP TRAY STD SET set to ON), and instead want to enter the paper dimensions every time you put new paper into the multipurpose tray.
- Press OK to exit the menu, and choose:
COMMON SETTINGS
10. MP TRAY STD SET
This option warrants some explanation. With MP TRAY STD SET set to OFF, every time you insert paper into the multipurpose tray, the printer will prompt you to enter the paper size. This is helpful if you routinely print on a wide variety of paper in the multipurpose tray. However, for printing lots of envelopes in a mail merge, this is kind of useless.
Press OK, and make sure MP TRAY STD SET is set to ON. Press OK again, and the printer will go into a submenu where you can set the paper size and type for the multipurpose tray.
- Select:
MP TRAY STD SET
1. PAPER SIZE
and press "OK"
SELECT PAPER SIZE will show in the display. Use the (-) and (+) keys to select FREESIZE. Press "OK" again, and get ready to measure your paper with a metric ruler.
- The following options are obvious. Keep the measurements of your envelope handy, you'll need them to specify the size of the page in the word processor later on. The first setting shown will be:
FREE MP TRAY SIZE
1. VERTICAL SIZE
Press OK and enter the vertical size of your envelope in millimeters, pressing OK to confirm
FREE MP TRAY SIZE
2. HORIZONTAL SIZE
Press OK and enter the horizontal size of your envelope in millimeters, and press OK to confirm.
MP TRAY STD SET
2. SELECT PAPER TYPE
Press OK to display SELECT PAPER TYPE. Choose "ENVELOPE" if you're printing envelopes. Press OK again.
- Settings for the multipurpose tray are now complete. You can press the "Additional Functions" key to exit the settings menu.
OpenOffice Document Setup

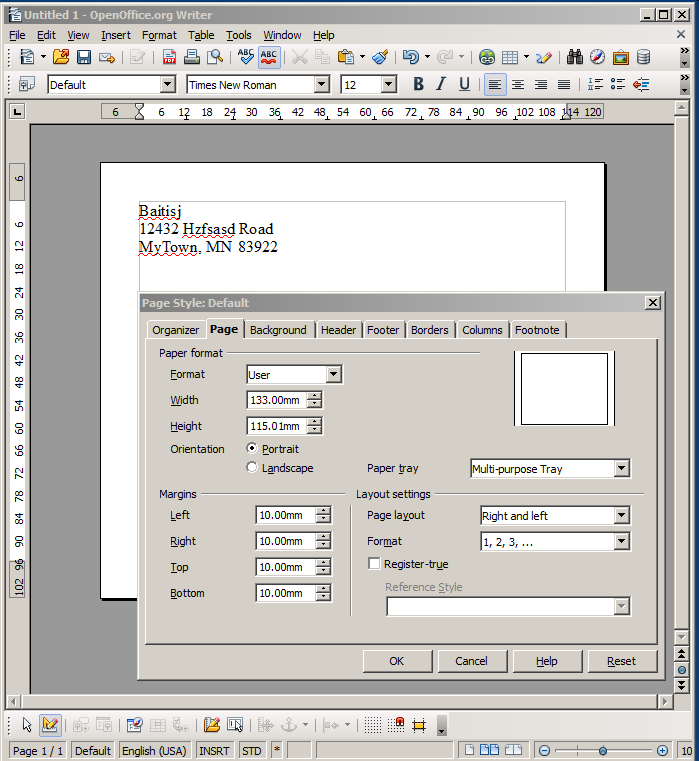
Now that you have the printer set up properly, you'll need to configure your document so that the page size matches the size of the envelope. In OpenOffice, create a new "Text Document." Choose the menu option that allows you to change the size of the page by selecting (from the menus): Format -> Page
- Make sure you have the "Page" tab open. Under the Paper Format, choose "User" -- it's buried within the list of page sizes -- and type in the width and height of the envelope. If the width of the envelope is greater than the height, also click the "Portrait" radio button. To the right of the page size, in the Paper Tray drop-down option list, choose the "Multi-purpose Tray" menu option. Choose some reasonable margins (e.g. 10mm) and click "OK."
- The part that ties it all together is in the print dialog box. Once your envelope is ready, choose File->Print... Next, make sure your Canon MF6500 series printer is selected, and click the Properties... button. Under the Page Setup tab, make sure that the "Page Size:" dropdown is set to "Custom [Name Fixed]." And, more critically, make sure that the "Output Size:" drop down option is set to "Match Page Size." The Orientation field does not seem to matter.
- Press OK to save and close the Print Properties dialog, and press OK to begin printing.

Hopefully, you're done at this stage, and your envelope is flying out of your machine. However, If the printer beeps, blinks madly at you with orange lights and says LOAD PAPER TRAY: FREE and CHANGE REG'D SIZE -> COMMON SETTINGS, you've got something wrong here. To clear a mad, blinking Canon, use the "Additional Functions" button and choose "3. PRINTER SETTINGS." Press OK, and press the (-) key to scroll to "10. RESET PRINTER." Press OK, toggle "RESET PRINTER" to "ON" by using the (+) key, and press OK again to clear the error condition. You can always turn the printer on and off, but doing a soft reset is probably easier on the printer's power supply.
Feel free to experiment with MP TRAY STD SET set to OFF if you print stock of different sizes. If you have this option "OFF," I find it easiest to deal with the printer in "COPY" mode. After inserting paper, by pressing the "Paper Select" button, I can highlight the LED that corresponds to the multifunction tray; the user interface then prompts to enter the size of the paper that has been inserted.
Enjoy!